![Vivid Logo-2.png]](https://boarding.hellovivid.com/hs-fs/hubfs/Vivid%20Logo-2.png?height=50&name=Vivid%20Logo-2.png)
PRODUCT DESCRIPTION
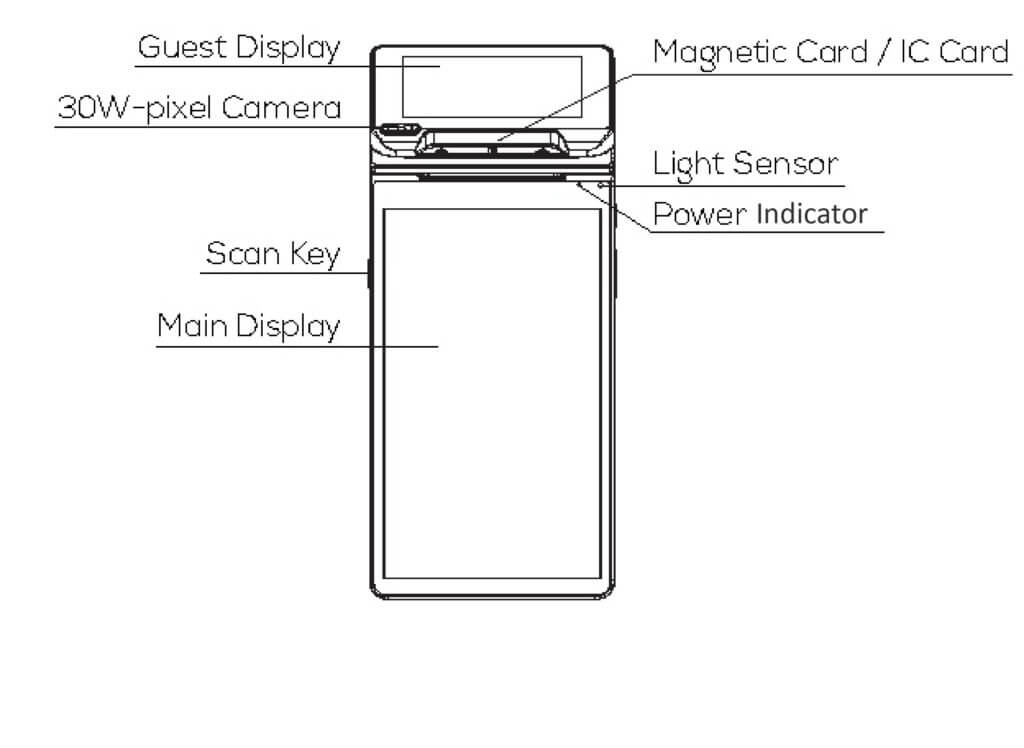
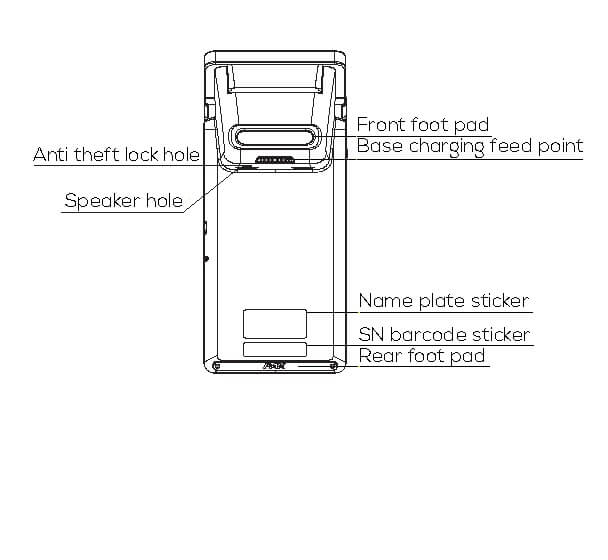
The following section points out the various hardware features and functions of the E600Mini.
Front View
Back View
INSTRUCTIONS
The following section provides basic operating instructions for the E600Mini.
Power ON/OFF
- Power ON: Press and hold the Power button for three seconds until the main screen displays normally.
- Power OFF: Press and hold the Power button for three seconds until the shutdown menu appears then tap “Shutdown”. The terminal will turn off after a few seconds.
Installation
Tear paper: Press the print paper downward along the cutter and tear it left or right when getting close to the main display.
Charge: Insert the external adapter or the base to charge the device. A red indicator light means the device is charging; green means charging is completed; the indicator flashing in red and green alternately means charging is abnormal.
Insert SIM/ microSD card: Insert the SIM Card Ejector Tool into the SIM / mircoSD card slot to open the tray and place the SIM card or microSD card on the tray. Gently insert it back into the terminal.
Connecting the Base:
- Use a network cable to connect the base’s LAN interface with a gateway device that can access the Internet, such as router, LAN switch.
- Place the host on the base.
- Insert the adapter 9V / 2A that comes with the terminal.
Base Usage Instruction
The base is mainly used for the host’s port expansion. Gently align and place the E600Mini terminal on the base. When the base’s network interface is connected, the E600Mini host will automatically switch the data
connection to the Ethernet connection on the base.
Note: When using the machine, do not shake or vibrate the base and E600Mini, so as to avoid the interruption of the data connection between the host and the base.
CARD READERS
The E600Mini includes the following card readers:
NFC/Contactless Card Reader
Place the contactless card on the center of the payment module screen.
Magnetic Stripe Reader
Place the magnetic stripe face down (keep the magnetic stripe card perpendicular to the main display), swipe card through the magnetic card slot at a constant speed.
IC/Smart Card Reader
Place the IC chip face down, then insert the IC card into the card slot, and push it to the end.
CLEANING THE DEVICE
- Do not use industrial strength or abrasive cleaner as it may damage or scratch the screen.
- Do not immerse the device in water or liquid.
- Do not spray water or cleaner into ports.
- To clean the screen, apply distilled water or mild glass cleaner onto a soft, lint-free cloth and gently wipe terminal.
Configuring the Terminal Display Language
- On the terminal’s main screen, touch the Settings icon.
- On the Settings screen, touch the Please Input Password field and use the keypad to type the password: either pax9876@@ or 9876.
- Touch the checkmark icon on the keypad when you are done and touch OK.
- On the Settings page, scroll to the bottom and touch System.
- On the System page, touch Languages & input.
- On the Languages & input page, touch Languages.
- On the Language preferences page, touch Add a language.
- On the Add a language page, scroll to, and touch the desired language.
NOTE: If the language has localized variants, select the appropriate regional option for your country. - If the selected language does not appear automatically, you can drag the language to the top of the list, as shown below:
Configure the Terminal Wi-Fi Connection
- On the terminal’s main screen, touch the Settings icon.
- On the Settings screen, touch the Please Input Password field and use the keypad to type the password: either pax9876@@ or 9876.
- Touch the checkmark icon on the keypad when you are done and touch OK.
- On the Settings page, scroll to the bottom and touch Network & Internet.
- On the Network & Internet page, touch Wi-Fi.
- On the Wi-Fi page, if Wi-Fi is Off, touch the toggle to turn it on. If Wi-Fi is already on, a list of available networks appears.
- From the list of available networks, touch the name of the network you want to connect to.
- Enter the password for the selected network and touch CONNECT.
TIP: You can touch the Show password check box before typing to ensure you are entering the password correctly.
After the terminal displays Connected for the selected network, touch the Back icon () to return to the Network & Internet page.