![Vivid Logo-2.png]](https://boarding.hellovivid.com/hs-fs/hubfs/Vivid%20Logo-2.png?height=50&name=Vivid%20Logo-2.png)
|
|
The setup guide will explain how to:
- Charge the terminal
- Install the printer paper
- Install the SIM card for mobile network access
- Configure the terminal’s display language
- Configure the terminal’s Wi-Fi settings
Charging the Terminal
After you remove the terminal and accessories from the box, you need to charge the terminal before you can use it. The pre-installed battery has a protective cover on the contacts to prevent the possibility of a short circuit during transport.
To charge the terminal:
- Turn the terminal over.
- On the back of the terminal at the bottom, slide the battery cover latch to the right.
- Lift the battery cover off the terminal. You should notice a plastic tab at the top of the battery.
- Lift the battery from the terminal and remove the plastic tab.
- Re-install the battery, pushing on the bottom of the battery to seat it correctly.
- Re-install the battery cover on the terminal and slide the latch to the lock position on the left and turn the terminal over.
- Insert the USB cable in the AC outlet and connect the outlet to an AC plug.
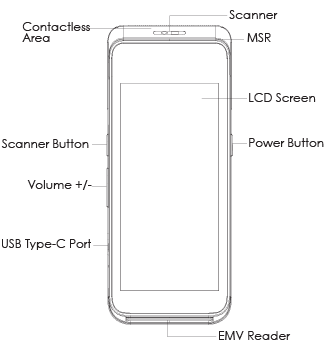
- Insert the USB Type-C connector in the terminal’s charging port, located on the left side, below the Volume control button. The terminal begins charging.
NOTE: The terminal’s charging port may have a protective cover; you will need to remove it before inserting the USB Type-C port.
Installing the Printer Paper
- On the back of the terminal near the top, lift the lever to unlock and open the printer cover.
NOTE: The printer cover opens on a hinge, it does not come off the terminal. - The paper tray contains an illustration of how to install the roll of paper.
Place the roll of printer paper in the paper tray, leaving about 2 inches (5 cm) of paper beyond the printer's cutter.
IMPORTANT: Make sure the paper unrolls from the back of the roll, otherwise the printer will be unable to print the transaction receipt. - Close the printer cover until it snaps into place and remove any excess paper.
Install the SIM Card
- Make sure the terminal is powered off and turn the terminal over.
- On the back of the terminal at the bottom, slide the battery cover latch to the right.
- Lift the battery cover off the terminal.
- Lift the battery from the terminal to remove and set aside.
- The terminal has illustrations for the different cards it can accept. Insert your SIM card in the space identified as SIM1 so the diagonal corner is facing the top left side.
IMPORTANT: The SIM card goes into the lower space and should not require great force to insert. - Re-install the battery and push on the bottom of the battery to seat it correctly.
- Re-install the battery cover on the terminal and slide the latch to the lock position on the left.
- Power on the terminal by pressing and holding the Power button for 3 seconds.
Configuring the Terminal Display Language
- On the terminal’s main screen, touch the Settings icon.
- On the Settings screen, touch the Please Input Password field and use the keypad to type the password: either pax9876@@ or 9876.
- Touch the checkmark icon on the keypad when you are done and touch OK.
- On the Settings page, scroll to the bottom and touch System.
- On the System page, touch Languages & input.
- On the Languages & input page, touch Languages.
- On the Language preferences page, touch Add a language.
- On the Add a language page, scroll to, and touch the desired language.
NOTE: If the language has localized variants, select the appropriate regional option for your country. - If the selected language does not appear automatically, you can drag the language to the top of the list, as shown below:
Configure the Terminal Wi-Fi Connection
- On the terminal’s main screen, touch the Settings icon.
- On the Settings screen, touch the Please Input Password field and use the keypad to type the password: either pax9876@@ or 9876.
- Touch the checkmark icon on the keypad when you are done and touch OK.
- On the Settings page, scroll to the bottom and touch Network & Internet.
- On the Network & Internet page, touch Wi-Fi.
- On the Wi-Fi page, if Wi-Fi is Off, touch the toggle to turn it on. If Wi-Fi is already on, a list of available networks appears.
- From the list of available networks, touch the name of the network you want to connect to.
- Enter the password for the selected network and touch CONNECT.
TIP: You can touch the Show password check box before typing to ensure you are entering the password correctly.
After the terminal displays Connected for the selected network, touch the Back icon () to return to the Network & Internet page.
PRODUCT DESCRIPTION
Front View:
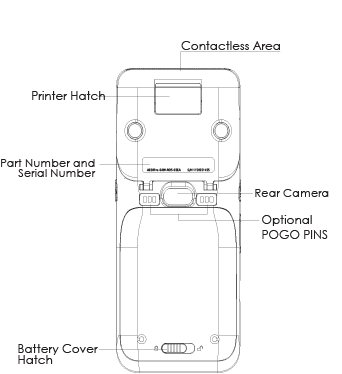
Back View:
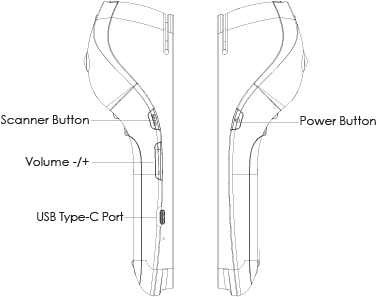
Side Views:
INSTRUCTIONS
Power ON/OFF
- Power ON: Press and hold the power button down for 3 to 5 seconds and then release.
- Power OFF: Press and hold the power button down for 3 to 5 seconds and then release.
SIM/SAM CARD AND BATTERY INSTALLATION
SIM/SAM Card
- Remove the back cover.
- Gently remove the battery from the device.
- Insert the card into the relevant card slot.
- Replace the battery and back cover.
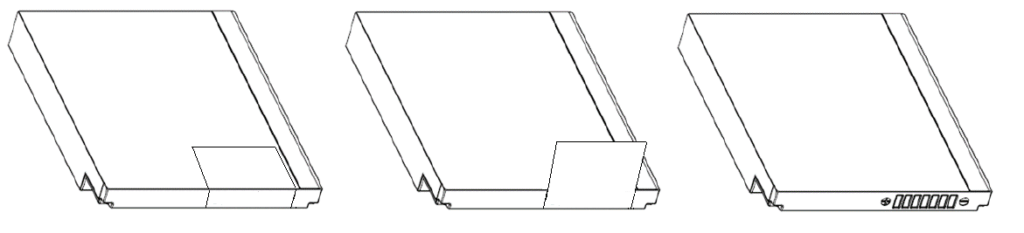
Preparing Battery for Use
- Open the battery cover on the bottom of the terminal.
- Take out the battery.
- Locate the white tab on the battery and peel back carefully until it is fully removed and the POGO pins are visible.
CARD READERS
Magnetic Stripe Card
Slide the card through the card reader slot from left to right or from right to left with the magnetic strip oriented towards the body of the device. Make sure that the card is fully inserted into the card reader while swiping the card.
IC/Smart Card Reader
Insert the card fully into the reader with the metallic contacts facing up and towards the device. Make sure that the card is fully inserted into the card reader while scanning the card.
Contactless Card Reader
The contactless card reader reads cards and devices placed roughly within an inch (2.5 mm). For best results, place as close to the reader as possible and center the card over the indicated area at the top of the terminal.
CLEANING THE DEVICE
- Do not use industrial strength or abrasive cleaner as it may damage or scratch the screen.
- Do not immerse the device in water or liquid.
- Do not spray water or cleaner into EMV Card Reader or ports.
- To clean the screen, apply distilled water or mild glass cleaner onto a soft, lint-free cloth and gently wipe terminal.
LITHIUM ION BATTERY
- Do not use or place the battery in direct sunlight and/or smokey, dusty environments.
- Do not strike, squeeze, and/or tread on battery.
- Do not throw the battery in any liquids or place in/near fires.
- If the battery is deformed or damaged, please stop using immediately and replace it.
- If the continuous working time is only half of a new battery, the battery life may be at its end. Please replace it.
- The specified battery model and charger must be used, otherwise there may be an explosion.
- The charging time cannot exceed 24 hours. If the battery is out of power, please recharge in an appropriate time and then disconnect the device.
- Please recharge the battery at least once every 6 months to avoid shortening its life.
- Replace battery every two years.
- Be sure to follow the instructions to dispose of wasted batteries.